I wrote this how-to guide with the immensely helpful counsel and insights from Bex Leon and Robin Fanning, as well as through an online survey of Blind / low vision / visually impaired people.

What is an image description?
An image description is a written caption that describes the essential information in an image. It’s often described as alt text since the alt tag is a common place to store them.
<img src=”link” alt=”image description here”>
Image descriptions can define photos, graphics, gifs, and video — basically anything containing visual information. Providing descriptions for imagery and video are required as part of WCAG 2.1 (for digital ADA compliance).
Additionally, image descriptions are a gesture of care and an essential part of accessibility. Without them, content would be completely unavailable to Blind/low vision folks. By writing image descriptions, we show support of cross-disability solidarity and cross-movement solidarity.
How to write a good image description
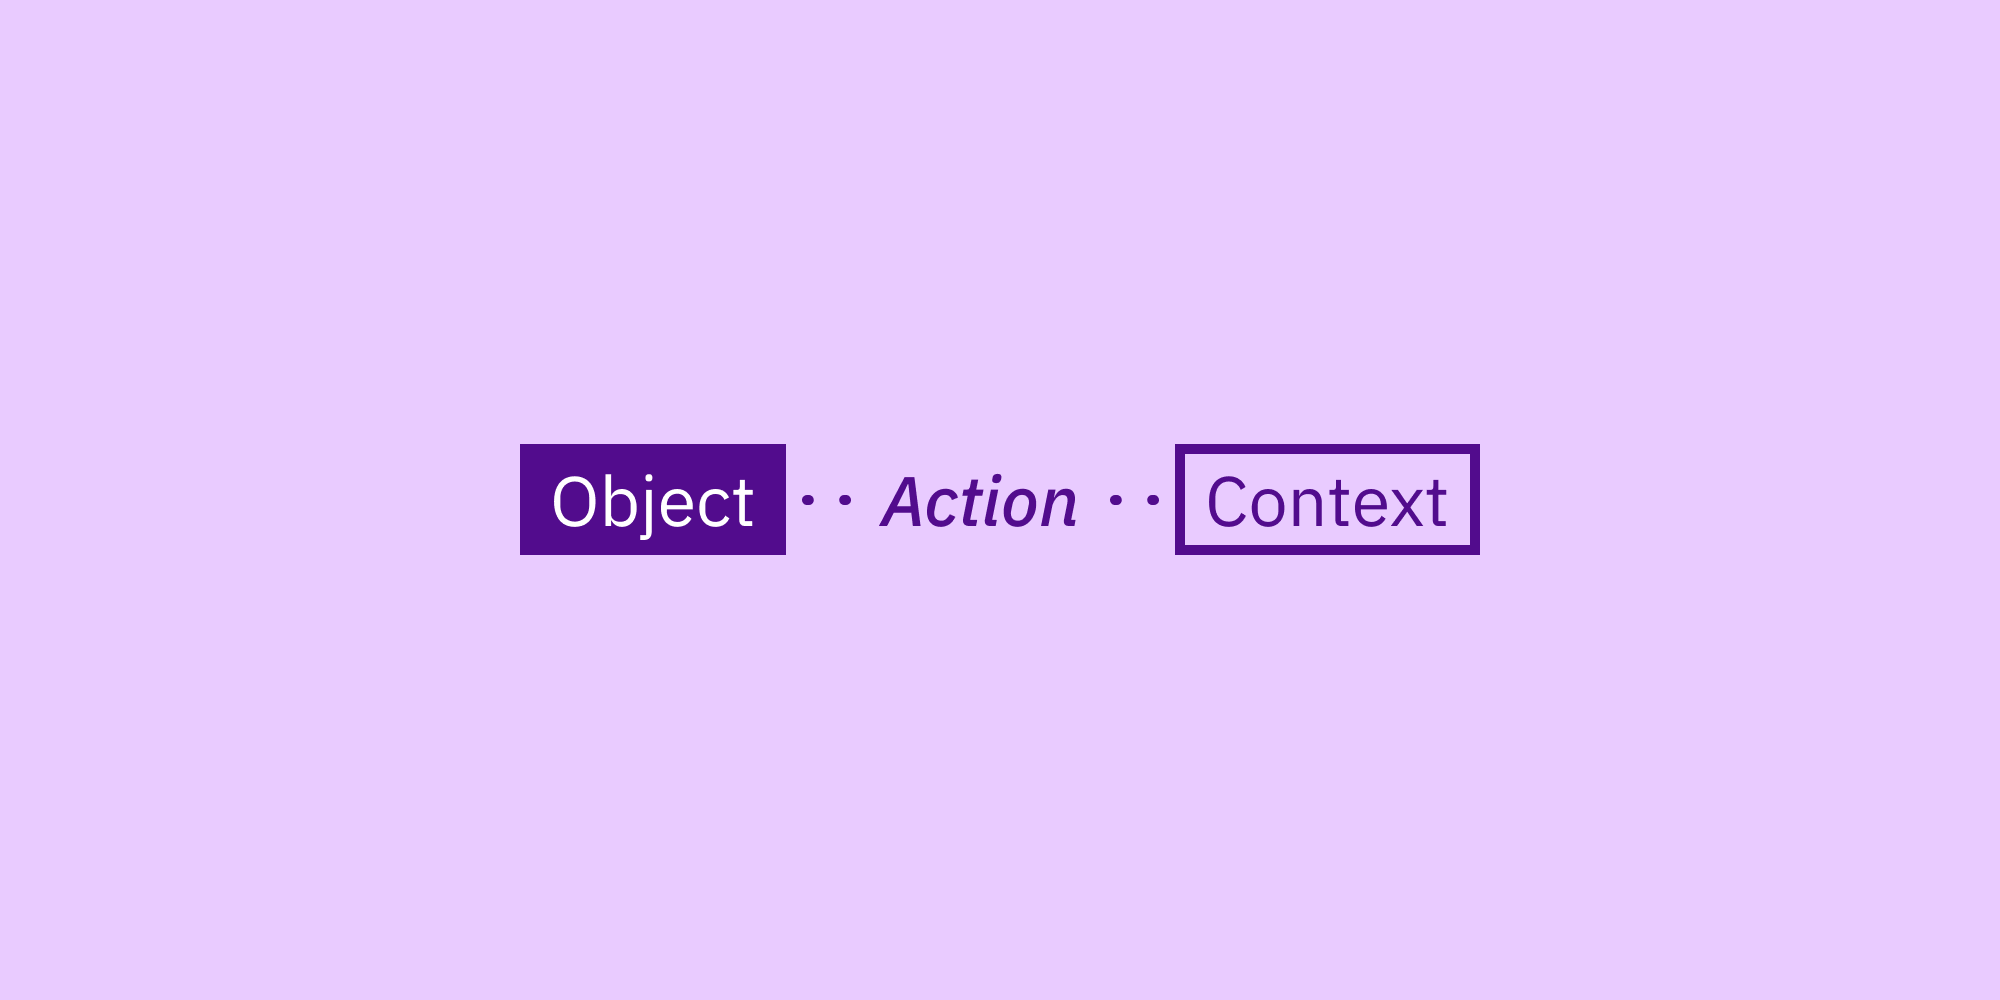
Object-action-context
The object is the main focus. The action describes what’s happening, usually what the object is doing. The context describes the surrounding environment.
I recommend this format because it keeps the description objective, concise, and descriptive.
It should be objective so that people using the description can form their own opinions about what the image means. It should be concise so that it doesn’t take too long for people to absorb all the content, especially if there are multiple images. And it should be descriptive enough that it describes all the essential aspects of the image.
What counts as “essential” can sometimes be subjective. In my research, some people preferred very brief descriptions while others preferred as much visual detail as possible. My best advice in this area is to be as descriptive as your audience needs. You know your audience and your content best. If your work is highly visual and your audience is interested, then add more detail. If you and your audience care more about the non-visual content, then keep it brief.
Example:

Black Lives Matter sign being held in a crowd.
Object: Black Lives Matter sign
Action: being held
Context: in a crowd
We can add more detail to this description to paint a more vivid picture. In most cases, I recommend adding the detail with the object-action-context format. This makes the description more concise.
A concise way to add detail: A painted Black Lives Matter cardboard sign being held anonymously in a blurred out crowd in front of a stone building.
A redundant way to add detail: Black Lives Matter sign being held in a crowd. Behind them, there is a building made of stone. The crowd is blurred out. The sign is painted on cardboard. The person holding the sign is anonymous.
You can see that the redundant example repeats a lot of words and skips from one thing to another, making it longer and more disorienting. The object-action-context format helps fixate on the primary focus, and then slowly expands to get the full picture.
However, sometimes there is so much detail that adding it will cause one big run-on sentence. In this case, it’s better to keep the first sentence short and in an object-action-context format. This way, people can get a basic understanding and skip through the rest of the details if they want.
Example:

A tattooed person holding a sign that says, “Teach your children well,” in a crowd of people. In the middle of the sign, there’s an illustration of the earth with 2 raised fists on either side that have a rainbow pride square background, a trans pride circle background, and brown skin tone stripes on the fists.
Object: person
Action: holding a sign
Context: crowd
To be even more descriptive, you can go into the meaning of the visual imagery. This is where image descriptions are useful to sighted people too because they provide an additional explanation for things that might not be obvious otherwise.
Example of adding meaning: The raised fist is a symbol of solidarity and specifically Black power as popularized by the Black Panther Party in the 1960s. The rainbow pride flag has rainbow stripes and symbolizes general LGBTQ pride. The trans pride flag has pink, blue, and white stripes and celebrates pride for the trans and gender non-conforming umbrella.
This is obviously a longer commitment and might not be necessary if you have written other content in a surrounding article, or if you’d rather reserve your energy from explaining and encourage people to look it up themselves. And obviously, if you choose to explain symbolism, then make sure to do the proper research.
Describing race and gender
In general, I recommend describing race and gender if (1) it’s relevant to the image, (2) if you know what their identity is, and (3) if the way you’re describing it is consistent with other descriptions.
It’s relevant if it’s an essential part of the message — such as a joke specifically about identity or celebrating the radical visibility of marginalized people. It’s known if the people in the photo have confirmed their identity. It’s consistent if you’re describing everyone’s race and not just people of color (rather assuming white as the default).
For example, the stock photo project Disabled and Here has created a library specifically of disabled BIPOC (Black and Indigenous People of Color). They have also kindly provided image descriptions! This is an example of describing identity that is relevant, known, and consistent.

Three Black and disabled folx (a non-binary person holding a cane, a woman sitting in a power wheelchair, and a woman sitting in a chair) partially smiling at the camera while a rainbow pride flag drapes on the wall behind them.
Other great diverse stock photo libraries include The Gender Spectrum, Nappy, and CreateHer Stock.
In many situations, mentioning race or gender might not be relevant at all. And while it might be tempting to label folks as “women” or “men” there is the risk of misgendering them. It’s actually better to say “person” or “people” and talk about physical characteristics more literally instead of assigning gender to every presentation (e.g. say “person with long hair” instead of “woman” or “femme-presenting person”).
Example:

Four people sitting on a sidewalk bench, most wearing sunglasses and heels and one with a big brown dog, in a city on a sunny day.
Describing complicated diagrams
In the event that you’re describing charts, infographics, or diagrams with more complexity, I recommend dividing it into sections and focusing on one section at a time in a logical order.
Example:

Graphic titled “Protesting safely” at the top in lavender text on dark purple background. It includes 3 sections: “What to wear,” “What to bring,” and “Don’t bring” all with graphic illustrations. In the light purple “What to wear” section, it says, “nondescript, solid color, layered clothing; cover identifying tattoos, goggles & mask, emergency contacts written down, heat resistant gloves, and tie your hair up.” In the medium purple “What to bring” section, it says, “water for drinking & tear gas, snacks, cash/change & ID, washcloth, bandages & first aid supplies, ear plugs, and protest signs. In the light red “Don’t bring” section, it says, “cell phone without first turning off Face/Touch ID, going on airplane mode, and disabling data, jewelry, anything you don’t want to be arrested with, and contact lenses.”
I choose not to go into detail describing visuals if the text essentially already describes them and if the description is already pretty lengthy. In this case, the goal of the image is definitely to convey information, therefore I felt describing the graphics would be distracting.
A few last tips
Because images are just a collection of pixels (for the most part) screen readers can’t detect text. Make sure to transcribe all the text in the image if you’re providing a description.
There are a few screen reader limitations to keep in mind. Be sure to write hashtags in title case #ForExampleLikeThis so that screen readers can decipher individual words. Also, avoid all caps because screen readers sometimes interpret those one letter at a time.
Most social media platforms these days offer an alt text option. From what I hear, it’s actually better to avoid this and put the description in the caption instead. This way, it’s visible to screen magnifier users and sighted people who might need or benefit from the description.
If you’re describing something that requires some subject matter expertise, it’s helpful to add a short explanation for additional context. For example, me and my opponent training BJJ (Brazilian Jiu-Jitsu, a grappling martial art).
Of course, people have limited time and energy, and image descriptions require time and energy. In my opinion, it’s better to have something than nothing. Better write a description, even if it’s super brief, so that the image is accessible rather than nothing at all.
There are community access groups out there where you can crowd-source image descriptions, e.g. People’s Image Descriptions run by Bex. Depending on your own position of power and access to resources, you can also ask a volunteer or pay a writer for their time. Writing image descriptions does not have to be a solo activity and can be a community effort.
I welcome feedback!
I wrote this guide because I had such a hard time finding a coherent image description how-to when I was starting out. I hope this is helpful! I welcome any feedback you have on making this information understandable, accessible, and respectful.