Welcome to the first article in our ‘ProtoBites’ series, an introduction to Microinteractions in ProtoPie.
This collection will explore the concept of microinteractions. We’ll not only see what they are, but also learn how to create our own unique microinteractions using the interaction design tool, ProtoPie. We’ll end up recreating this ‘Dark Mode Toggle’:
Try it for yourself in the ProtoPie cloud ☁️:
Before diving into prototyping, this first bite will outline what a microinteraction is, and explore the ProtoPie interface both to get used to it, and also see how it’s carefully crafted for creating these type of interactions.

Why microinteractions?
A microinteraction is a small moment that occurs when a user interacts with an interface. As NN Group put it:
“Microinteractions are contained product moments that revolve around a single use case.”
NN Group
These are great for a user’s experience, as they provide an extra layer of feedback to a user that that can:
- 👉 Help guide a user
- 👀 Direct a user’s attention
- 💬 Communicate the success status of an interaction
- 👂Provide extra meaning to keep users informed
- 💙 Add character and emotion to your interface
- 🤩 Delight your users
Essentially, if done well, the extra feedback microinteractions provide can go a long way in improving the overall user experience of an app. In fact, it can be the difference between someone choosing to use your app or not.
“The difference between a product you love and a product you tolerate is often the microinteractions you have with it.”
Dan Saffer
Popular microinteractions from well-known companies:

Twitter Like 
Facebook Like 
iPhone power off
Elements of a Microinteraction in ProtoPie
When it comes to creating an effective microinteraction, it’s useful to first break down, and understand what a microinteraction consist of. Dan Saffer, writer of Microinteractions, provides the perfect model to do this, outlining 4 core parts to every great microinteraction:

- ➕ Trigger: initiates the microinteraction (e.g. tapping the switch)
- ✔ Rules: determine how the microinteraction works
- ⚠️ Feedback: illuminates the rules (e.g. visual/audio/haptic feedback that respond in accordance with the rules)
- 🔄 Loops & Modes: meta rules that affect the microinteraction
The ProtoPie tool itself is designed with these at the forefront of its interface.
Let’s look at each in 3 steps:
3 Steps to Microinteractions in ProtoPie
1. Creating the Trigger
As with Saffer’s model, everything in ProtoPie starts with a Trigger. Upon opening the tool, the first option we have is creating a trigger. Clicking ‘Add Trigger’ shows the wide range available, starting with common interactions such as touch, mouse events and keypresses:
Microinteractions aren’t only trigged by user actions though – they can also be triggered by a system. For example, an application can start a microinteraction itself when a given set of conditions are met. When that’s the case, ProtoPie’s trigger sensors are very useful, including things like:
- 🎶 Sound
- 📏 Tilt
- 🧭 Compass
- 📥 Receive
One example of a microinteraction triggered by a system is when the time of day changes. This is especially relevant to our demo, when dealing with light vs dark mode.
Moving on, once a trigger is added to an element, you can add your own rules, and also feedback in response to the trigger chosen. For instance, I’ve added a simple ‘Tap’ trigger to a sun icon. When the user taps the sun, something will happen. What happens in the microinteraction is determined by the rules and feedback applied that make it up:

2. Adding Rules and Feedback
Rules are the conditions necessary for an action to be triggered, dictating how the microinteraction will work. Feedback consists of the visual/audio/haptic response that works in accordance with those rules, highlighting them to the user. As stressed by Saffer, feedback may also contain it’s own rules, which is why they are combined in this section.
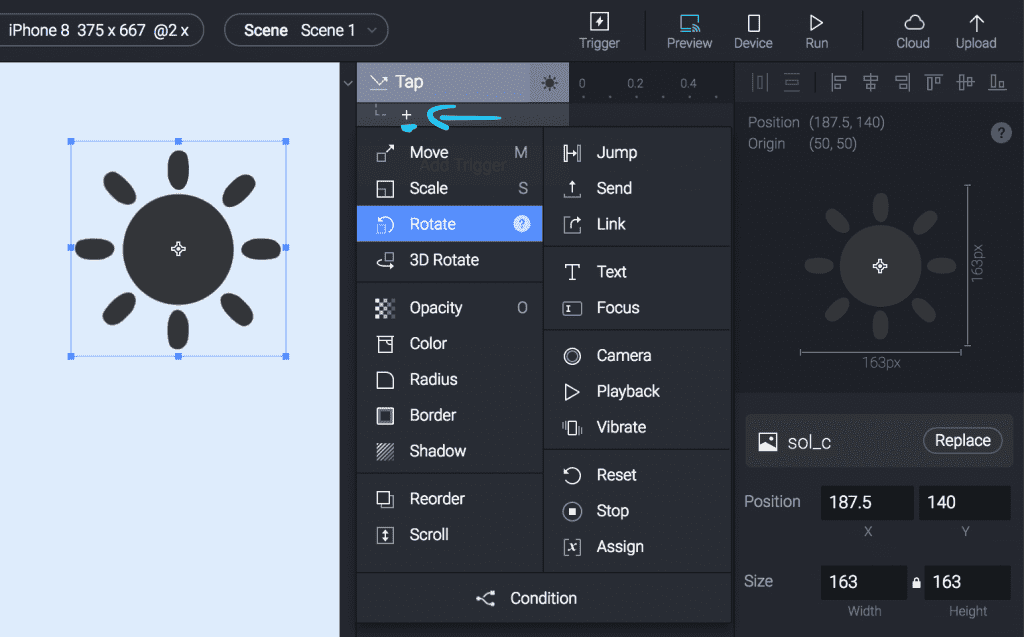
In ProtoPie, rules and feedback options are shown in the dropdown menu after clicking the plus + icon under your selected Trigger:
To demonstrate a possible rule, let’s look at our toggle example. A toggle is like a switch, so there’s a single clear rule that you might expect:
“If light mode is active, switch to dark mode. If dark mode is active, switch to light mode.”
However, another rule to this toggle could be the number of fingers the user gestures to initiate the trigger:
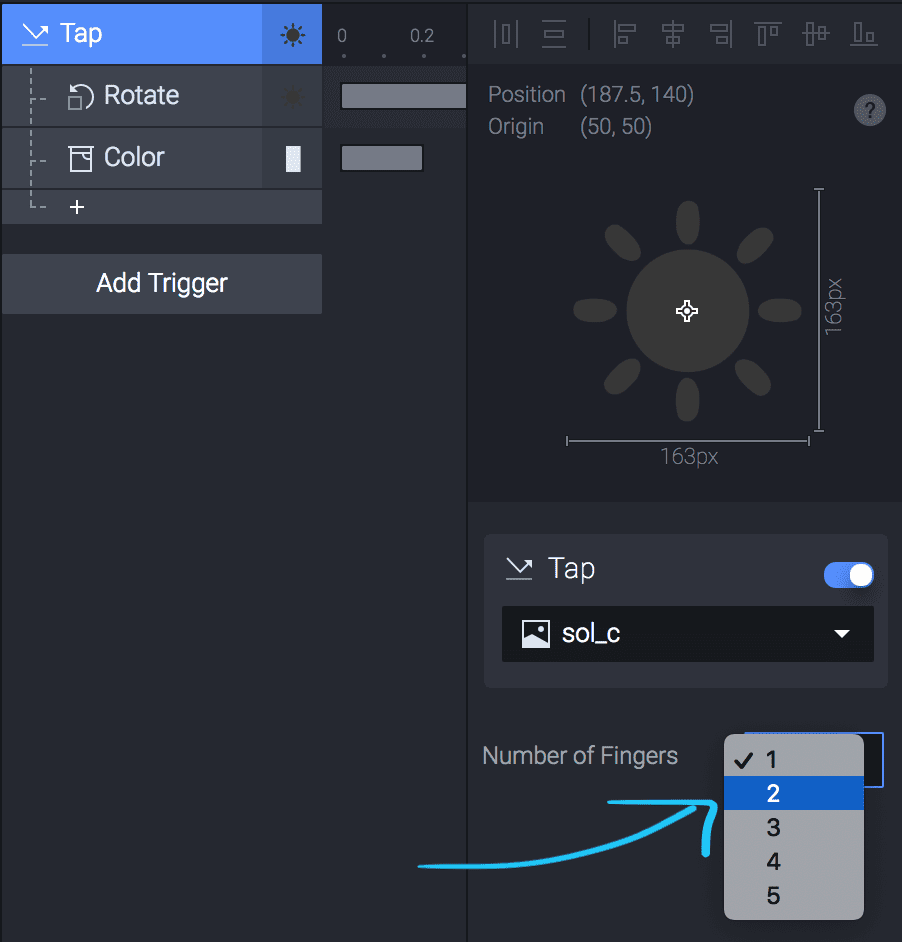
Feedback Rules
Rules for feedback in our toggle are are less binary. For a dark to light effect, we have to consider the following questions:
- How much should the colors change?
- How much should the icon rotate, and how fast?
- How far does the toggle in the switch move across?
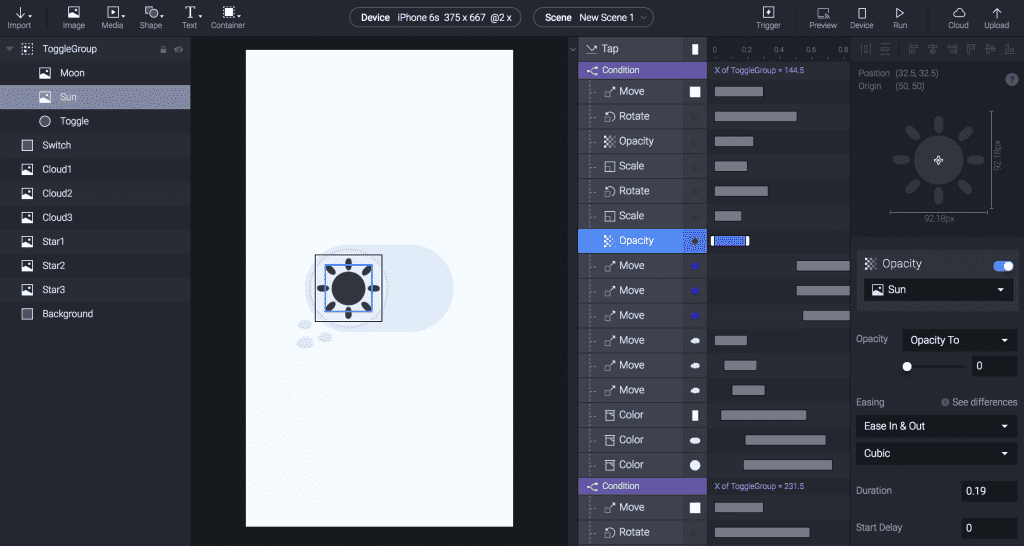
These can all be selected and tweaked in the right panel of ProtoPie. The toggle animation we will create rotates the icons, so we’ll start with this animation to demonstrate. Selecting the Rotate option as Feedback for the sun icon, we’re then presented with a range of specific options that can be configured for the rotation:
- 🔄 Degrees to rotate
- ⏱ The speed and timing of the rotation
- 🕑 Time delays before the animation
- ✨ The animation style (e.g. Cubic Bezier creates the bounce effect)
You may also notice the ‘Repeat’ option pointed out at the very bottom of ProtoPie’s right panel. This is an example of the final part to microinteractions – Loops and modes.
3. Considering Loops and Modes
If the Repeat option highlighted above is checked, the microinteraction will continue repeating forever, until stopped by a new rule or trigger. For our dark mode toggle, you might consider the use of loops/modes to answer the following questions:
- 🌚Does dark mode stay active forever?
- ☀ Does light mode activate automatically in the morning?
- Are there any system initiated triggers?
What’s Next?
We’ve covered some main benefits of using microinteractions, and seen how the ProtoPie UI is a great environment to create them. In the next part of this series, we’ll recreate the toggle interaction. In the meantime, you can download the demo file from the ProtoPie cloud and try it out.
If you want to go deeper into the theory, these are some great references:
- Microinteractions in User Experience
- What is a Microinteraction by Dan Saffer
- How microinteractions improve your UX design
The new ProtoPie V3.11 is also available. Check it out, and get ready for part 2 of this series!
Thanks to ProtoPie for sponsoring this article. All thoughts are our own honest opinions.