Build Design Systems With Penpot Components
Jul 21, 2:15 AM
Penpot's new component system for building scalable design systems, emphasizing designer-developer collaboration.
smashingmagazine.com

medium bookmark / Raindrop.io |
Whether it is to present a Proof of concept to the client or share the product vision with the team or to explain the user experience flow by making a prototype , creating a motion design immensely helps the viewer to connect and understand the concept or product effortlessly.
Today, we are going to see a workflow to create UI motion using After effects and some best practices. Are you wondering why After effects since there are lot of softwares out there? Although there are many evolving softwares, Aftereffects is the classic tool for motion design , animations and effects. There are various tutorials on after effects available on the world wide web, but here we are specifically gonna talk about using the tool for UI animations. Let’s take the plunge without wasting another minute.
It is best to visualize the end output with your eyes closed before you start anything. This way you will understand which elements are to be animated and what all layers would be static, so it would be easy to segregate. Yes, segregating and organizing the photoshop or illustrator file containing the design layers is the first and primary thing. It can be a tedious process at times (In all honesty, it’s most times) but you would be thankful when you work with those optimized layers in AE.
We mean source file by the optimized photoshop or Illustrator file, images such as jpg, png etc. Since AE does not embed these files and keeps them as a linked file, it is best to create a project folder and a source folder inside the project folder to store source files. In this way even if you move the project to another designer, the source files would not be misplaced. Also create separate folders such as Audio, etc, as per your requirement.
Let’s understand what happens when you pull a Photoshop file into AE. A group in ps becomes a composition in AE. A layer remains as a layer. When you prepare an illustrator file, the elements you want to be separate in AE to animate should be kept in separate layers in illustrator. Though AI file is also compatible with AE, PS file with optimized layers is a better preference over AI.
While preparing a Photoshop file, it is good to flatten the elements or background that are going to be static. You can group them together and merge them, or right click and rasterize them. The more rasterized layers you have, the faster your file would work in AE, without lagging. Though it works as a linked file, updating a layer in source photoshop file would not update the same change in AE, most of the times. For that matter, you can always leave some empty layer in photoshop while prepping, and later you can add a new element in the empty layer and it would appear in your AE file as well. Please rasterize all the smart objects , and vector layers .
Prep your ps file by Simplifying layers , rasterizing them, Keep in group if you want it to be in a composition in AE , ( or you can precompose in AE later as well ) and leave some empty layers. The less number of layers , the better.
Now lets pull our source file into AE. When you import an PS file into AE you will see a dialog box .

Always select Composition — Retain Layer Sizes and Editable Layer Styles. This imports your file as a composition and includes access to any layer styles you’ve selected in Photoshop. You can see all the layers and compositions in the project tab on the right hand side top. You can create folders there and organise the layers into a layer folder and all imported comps into a comp folder, for your use accordingly.
Create a composition named Final_Render ( or any name you want ) which would be used for your final render. It is important to set the composition settings . { When working purely with digital assets, and no video, I set the composition as follows:

In general 1920*1080 is meant for HD resolution videos. But it depends on which medium you are rendering for. It can be smart watch or mobile screen and the resolution would change accordingly. Setting the Frame Rate to 60FPS provides a smooth animation but depending on project you could go for 30 FPS as well.
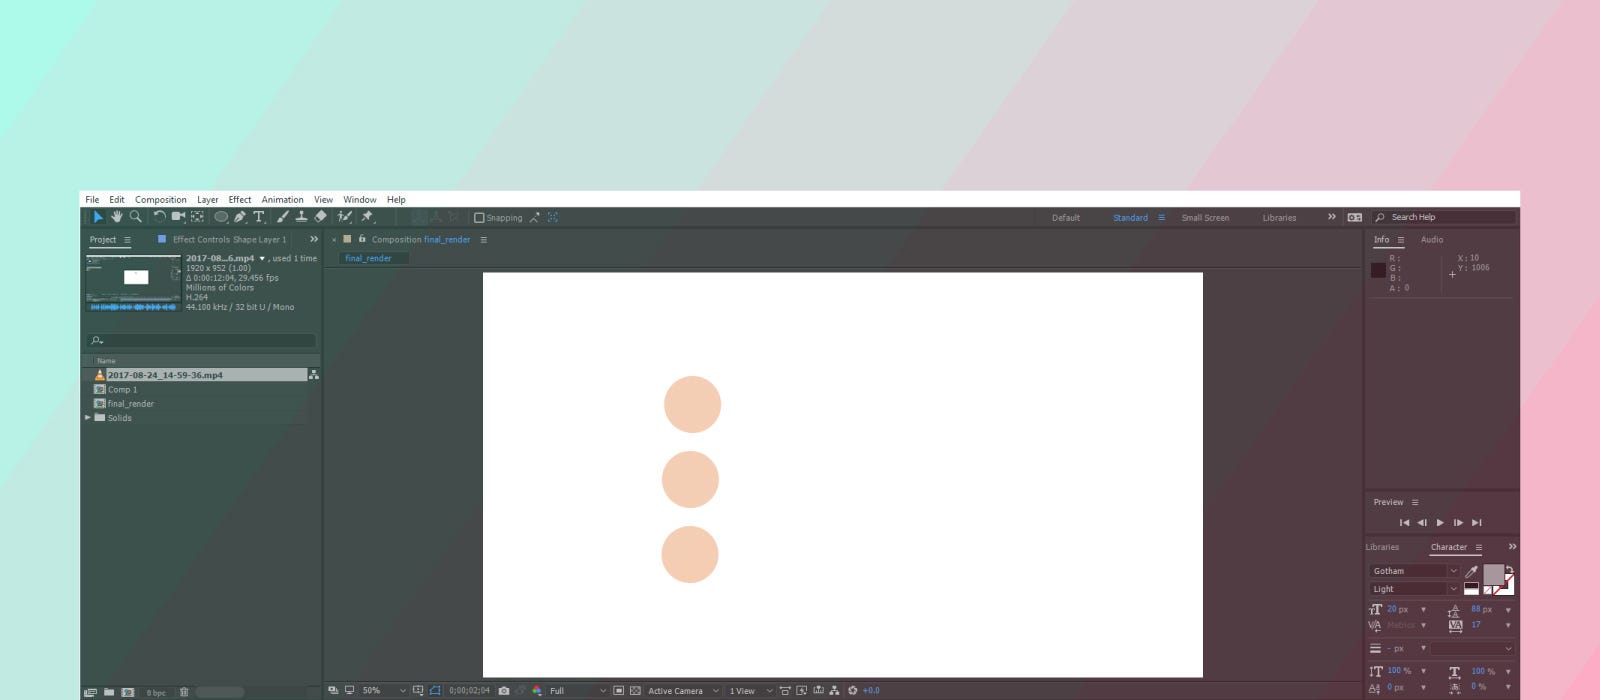
You can work on the standard layout and if you don’t find any windows or tools you can find them in windows menu.
Now before we start setting keyframes and move the objects, let us get to know some shortcuts which would make your life much easier and work faster.
The basic thing is Animation works by setting keyframes. You can smooth out a transition between one key to another by adding ease-in ease outs to it . We can do this by using the graph editor and using either the speed graph or value graph. Speed graph is much easier to manipulate by assigning values by double clicking on a key . To assign value to multiple keys, select the, right click and go to key interpolation and assign the value for all. There is also a script called ease wiz to do this job. Also use opacity animation to smooth out transitions.

There are many scripts and plugins for different functions of AE, which can be found online. But honing the basic principles of animation is as crucial as learning the tools. It is all about the timing and spacing.
Offset or delay This technique helps a lot to create a sequential motion. You can set keys for multiple layers/objects of same kind, and you offset or delay the keys by 1 or 2 frames , you can get the sequential motion, which can be very useful to show the hierarchy of UI.
A Precomp or A comp works like a smart object in photoshop or like a symbol in flash or sketch. A change made in a comp will effect and show wherever the comp is used. This can be very useful and used in a smart way to minimize effort.
There are different approaches animators can take to accomplish an animation. Best practice is to keep the UX in mind, understand the flow of the UI, and start animating.
While working on a project where the screens keep changing, you can still create a animation prototype with future proof, to be able to change the screens without screwing up the transition. Create different compositions for the screens and animate the compositions, which allows the comps work as a placeholder and you can always change the screens inside the comp .
There are options like motion blur, parent, hide shy layers, and matte options in the layers panel which are very handy to use. Motion blur provides smoothness to swift motions, parent can constrain the motion of a child layer to the layer it is parented, hiding shy layers would declutter your workspace by hiding less used layers. And matte option helps to compose the layer by masking with the layer above. Tips — sometimes while animating the opacity of a composition, it might not happen smoothly. To avoid this, remove the continuously rasterize option.
You can make use of nulls to transform (move, rotate, scale) more than one layer at once according to the null’s anchor point by parenting those layers to the null. The null can also be used to add some secondary motion to layers which already have keyframes on them to avoid messing up with the existing keyframes.
{ Tip: In you feel like After Effects is running slow: Go to Preferences > and Empty Media & Disk Cache. You can also try allocating more space to your cache if you have space available. }
There is also 3D option in the layers panel, which converts the layer into a 2.5 D kind of mode. So you can rotate them 3 dimensionally, but the object would still be 2d . If you install the plugin called element 3D you can have more 3D objects and options in it to play around.
Also in After Effects cc 17 (version 14 and above) you can use Cinema 4d Renderer from composition settings which gives you the option to extrude a layer when you turn on the 3D switch on it. The feature is limited right now and doesn’t work well with masks and effects but if it is a basic extrusion you can give it a go. Also it is much faster than the traditional Raytraced renderer used to extrude objects in previous versions.
The output depends on where you are going to use it. Generally for a video, it is best to render out an Mp4 using Adobe Media Encoder(shortcut crtl+alt+M/ CMD+option+M).
In case Media Encoder is behaving a little problematic (which happens for complex projects sometimes) you can use After Effects’ inbuilt renderer to render out .mov files by using Quicktime with H.264 codec.
A plugin called ‘Bodymovin’ can export shape layer and text animations into JSON code which can be used by developers to embed the animation directly without using gifs.

Thank you. Do share your tips as well. You can follow us on Facebook/LinkedIn/ Twitter
Authors: Dhilip Kumar G. & Vishank Kumar
Originally published at lollypop.biz.
AI-driven updates, curated by humans and hand-edited for the Prototypr community


