Build Design Systems With Penpot Components
Jul 21, 2:15 AM
Penpot's new component system for building scalable design systems, emphasizing designer-developer collaboration.
smashingmagazine.com

medium bookmark / Raindrop.io |
Hi there, I’m excited to finally be writing a post about this project I’ve made on learning how to use Framer. It was a really fun experiment and made me think of the different ways wich we can prototype and validate interfaces for digital products.
First of all, I have to say I’m a huge fan of Sketch. Since I discovered the tool, I began to strongly recommend it to every person and team I’ve worked with, for believing that it allows us to create prototypes more quickly, and therefore share more resolutions of product problems with the team.
Find tools that are powerful and easy to use are really important to me. So I can spend better my time thinking if what I’m building are valuable to people.
With Invision, another tool I absolutely recommend, we are able to sync our Skecth artboards with one click and document the interface interactions in a better way. But sometimes, the interfaces are just to complex to explain, and for that reason I was brought to Framer.
Framer screenshot
Framer is a awesome tool that allows us to create interfaces and shows how it behaves. If you work with a medium or large team, you can probably relate with common problems, such as showing how the interface that you build will behave. With Framer, you can demonstrate the animations and transitions elements, as the elements states and much more.
To illustrate how Framer works, let’s compare how the interfaces are build in a simple Front-end ecosystem:
Getting in the code tab, we have to use CoffeeScript, wich is simply a programming language that transcompiles to JavaScript. If you have some logic skills and have already played with Javascript, you’ll be able to prototype some stuff.
When it comes a time that I have to learn something, the best and most effictive way that I came across through the years was either taking a introductive course or reading a book about the subject, to understand the concepts, the basics. And only then, I build something.
After some research I found Framercasts, a really good course that helped me get ahead with Framer.
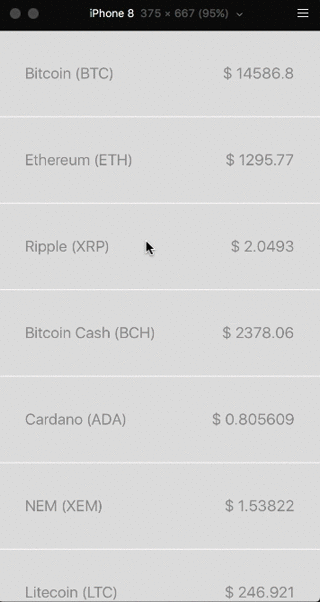
For a first experiment, the idea was to create a simple prototype that would show the values of the top cryptocoins in the market. To check and validate these informations I used the CoinMarketCap, a place where I could find all the necessary information about any specific cryptocoin I wished to know about, how for example their price, their changes and other.
The website also provides an API, what gave me an Idea on how to create a prototype using real data.
When working in a project, I always try to use in the prototypes the most real content as possible. It seems obvious but when using fake content like Lorem Ipsum, the design ends up receiving a false reality of the whole, and It can be really frustrating seeing our such beautiful design being breaked in production.
To get started with this prototype, I first looked and retained all possible information that the API could give me and thought about the most important informations that I had to display in the app. After that being done, I decided to talk with some entusiasts friends and get their opinions on my initial ideas.
The next step was to create the prototypes, and how I’m more familiar with Sketch, I chose to create the firsts there. My decision on using Sketch in this initial steps was also motivated about what Craft could do: it allowed me to populate the design with real data. You only need to pass wich data you want to display in a specific layer and done. ✨
Craft for Sketch by Invision
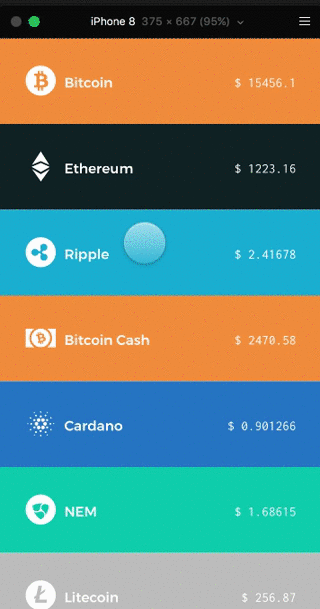
After some iterations, the first screens of my app had finally been done:
In this proposal, I’ve tried to create an APP with a simple UI, but at the same time adding some meaningful animations when the user first interacted with the APP. To demonstrate how they would follow, I started to use Framer.
Framer has a Documentation that answer all our doubts about the tool. But if you get stuck in one point and can’t manage to go any further, don’t panic.
They have a awesome Group on Facebook where people help each other and post great stuff every day.
The first thing I did was finding a way to get the information from the API and show in the prototype. Framer made my life much easier because with one line of code, I get a JSON with all the data needed.
Then, I started to project on how I’d build the interface elements with framer. Some time reading the documentation and that’s what I figured out:
With all that in mind, I started the code.
Even if you’re not a programmer, no need to be so scared of the code tab, because when you draw a rectangle in your Sketch or Framer design tab, it’s the same thing as telling your computer: “hey, draw this line of code, and draw it with this color and in that position…”
Something like this:
I know life’s not so simple. Layouts are complex and learning how to code is a real challenge, but that stupid example shows how you can start thinking and begin to create some elements in the code tab.
With this in mind, let’s go back to the app.
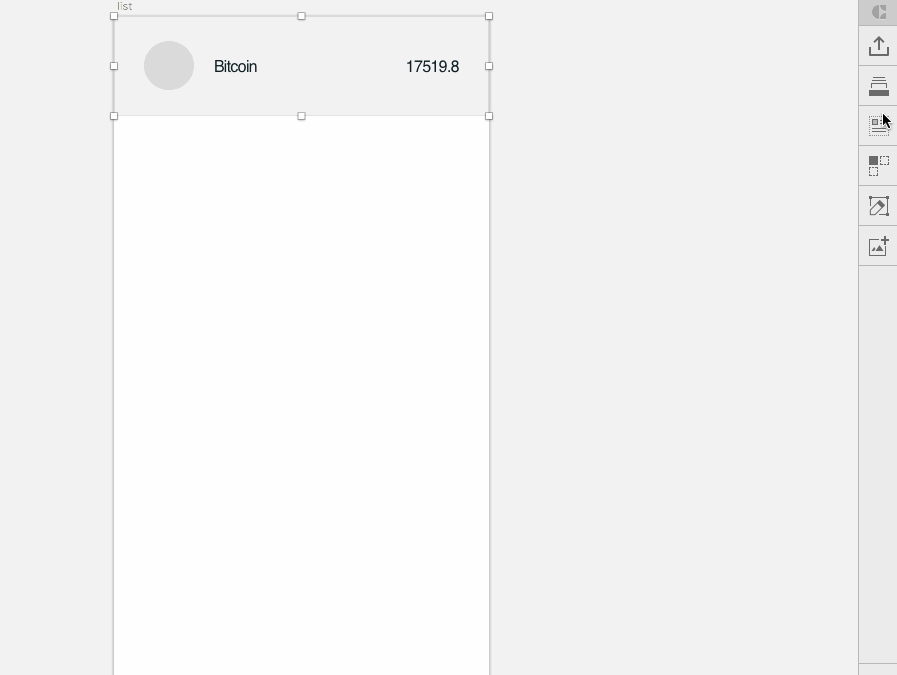
Before, I’ve said that first we needed to create a container list where we’d put all the coins and show the main info. Taking all this consideration, I found on the Framer docs the ScrollComponent, and made this:
After the ScrollComponent is made, we have to create a component with three elements:
Taking this infos into account, let’s create this component that I’ve named as coinRow:
Now is with more lines of code, but if you take some time and read the elements, you’ll see the example above is very similar to the one you’ve made in Sketch:
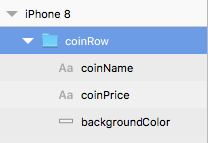
In this items, I used a Layer, and two TextLayers. Bellow each item I put its properties, like backgroundColor, fontSize and more.
Now, here comes a cool part. Let put some real data using Javascript Loops.
You can think of a loop as a computerized version of the game where you tell someone to take X steps in one direction then Y steps in another; for example, the idea “Go five steps to the east” could be expressed this way as a loop
If you’d like to know more about JS Loops, I recommend this.
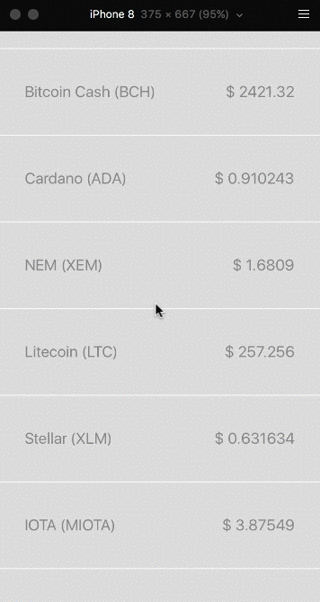
Back to the code, We get this:
And this is the result that generated from all the code We’ve made before:
Cool, isnt it?
In this post I wont demonstrate how I’ve build the overlay page, just for it was pretty similar to the examples above. I only created Layers and TextLayers.
Now, I’ll show how we can animate elements with Framer.
There are two ways we can animate using Framer: Using Animation Objects or switching between States. I’ll talk about each one and show how I personally used it.
In my prototype, I have 4 main animations:
With that in mind, we can begin to write our animations.
Animation objects manage targeted animations on a layer. It’s options allow you to define curves, timing, delays and more
Layer states manage and organize different combinations of layer properties. For example, you can see:
With our states and animations created, we now have to mix that with some events to get this result:
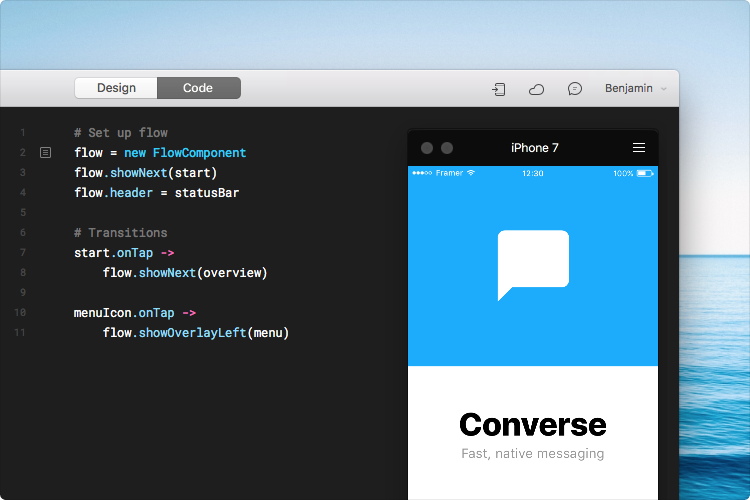
Once the animation is working nicely, we have to show the modal for our users. To make this happens, we need to use the FlowComponent.
The FlowComponent helps your transition and navigation throught prototype screens. Using this is quite simple, take a look:
With flow content, you can simulate common transitions like flow.showNext(page) and flow.showPrevious(), or create a custom animation, that was the case with my experiment.
To make this, you have to:
And that’s all folks. For this post I simplified the code to the fullest so I could give you a glimpse on how powerful Framer really is. My final prototype is more complete, I ended adding some colors, coin icons and charts (unfortunately the charts are just a .svg file, the CoinMarketCap API doesn’t provide historical data — yet).
See the prototype live:
If You’re not familiar with Javascript and want to learn more about Coffeescript in Framer, I strongly recommend the Javascript30. Wes Bos gives awesome tips and help us with that with his 30 days challenge.
If you want to create an experiment with real data but don’t know wich API to use, this repository contains a long list that you can check.
Also, if you’re from Rio de Janeiro, I’ll start to organize Meetups about Framer. Interesteds in learning more, or talking about it, please join us in our Facebook Group.
The full post example code here:
Thanks for reading. 😊
AI-driven updates, curated by humans and hand-edited for the Prototypr community


